Adding/Editing Group Definitions
To add a group to the database,
- Do either of the following:
- Select Demographics > Group Demographics from the Main menu.
- Click the Select a Group icon in the Demographics panel and then click New on the Group Search screen.
- Group Name: Enter the up to 50 characters.
- Domains: Select the domains in which the group can be scheduled.
- Resource: Click the button and choose a default resource for the group.
- Enter the maximum capacity for the group. Leave the default 0 (zero) if the capacity is unlimited.
- To have patients automatically removed from the group when their group member End Date is exceeded, select Remove End Dated Group Members.
- To have patients automatically removed from the group when their discharge date is exceeded, select Remove Discharged Members.
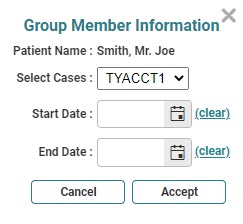
- Click Add in the Group Members panel and select a patient from the Patient Search screen. The Group Member Information screen will appear.
- Complete the following parameters:
- Click Accept to complete the patient's membership in the group. Click Cancel to abort the addition of the patient. The screen will refresh and the patient's description will appear in the Group Information panel.
- Repeat steps 6–7 as necessary to fill the group or complete its definition.
- Click Save to complete the group definition. Click New at any point in the data entry process to clear the screen of unsaved data and prepare it for a new entry.

Select Case: Verify that the correct case is selected. Otherwise, click the drop-down and make the appropriate selection.
Start Date: Enter or click the calendar button and choose the appropriate start date for the patient's participation.
End Date: Enter or click the calendar button and choose the appropriate end date for the patient's participation.
Editing Group Definitions
Edit the definition of a group or change patient composition or details as needed. Simply, access the group information, make the appropriate changes, and the save the record.
Editing the Patient’s Case
- Click the Edit link in the patient's Description line. The Group Member Information for [patient name] screen will appear.
- Click the drop-down in the Select Case field and then make the appropriate selection.
- Click Accept.
- Save the group.
Note: It is possible to review the demographic details of the selected patient by clicking the patient description in the Patient Name line. This will open the selected patient's demographics in a separate tab.
Adding Patients
Add patients to the group at any point.
- Navigate to the group demographic screen and select the appropriate group to edit.
- Click Add and select the appropriate patient. Repeat as necessary.
- Save the group.
Deleting a Patient
- Navigate to the group demographic screen and select the appropriate group to edit.
- Click the checkbox next to the patients you wish to delete.
- Click the column header Remove.
- Save the changes to the group.
Key Considerations
- Group management is tied to the following user rights:
Create Groups: This right needs to be set to Full in order for you to be able to create new groups. Set the right to None to disallow group creation.
Edit Group Membership: This right needs to be set to Full for you to be able to edit the membership of the group (i.e., the patients associated with the group). Set the right to None to disallow editing group membership.
Edit Groups: This right controls whether you can edit the description, capacity, resource, or domains associated with the group.
Override Group Maximum Capacity: Enable this right so that you can override the defined capacity for a group even if you don't have the rights to edit the group. If you have edit membership rights but do not have this right (or Edit Groups), then you will not be able to add members beyond the capacity defined for the group.
- You can create groups without any members and schedule them as a placeholder.
- If a patient does not have an active case, they can not be added to the group. You will have to remove that patient from the group, exit the screen, then go to the Case tab of their record and add or edit the case so it can be scheduled.
- Patients that are added to an existing group with pending appointments will be automatically scheduled for the remaining future appointments for the group.
- In domain products, the case must belong to the domain for which the group is being created.
- Two reports that help manage groups include the Group List and the Group Member Status. The list report is what you expect—a current list of group members. The status report will list which members of a group were added or removed for a given date range, by date, time, and the user who made the change.
Likewise, patients who are removed (not canceled) from an existing group will be removed from any future pending appointments for the group.
